A practical, beginner-friendly guide to sharpening kitchen knives on a whetstone, from setup and angle control to burr removal and finishing strokes.
A dull kitchen knife is a nuisance until it becomes a hazard. It slips through tomatoes badly, chews herbs instead of slicing them, and makes every cut feel like work. The good news is that a whetstone is not mysterious once you stop treating it like a test of faith. You are simply guiding the blade across a wet abrasive surface at a steady angle until the edge is re-formed and then refined.
If you are new to sharpening, the goal is not to become a blade whisperer in one afternoon. The goal is to build a repeatable routine: stable setup, consistent angle, light pressure, burr detection, and a careful finish. That is enough to sharpen most kitchen knives at home without turning the edge into a rounded disappointment.
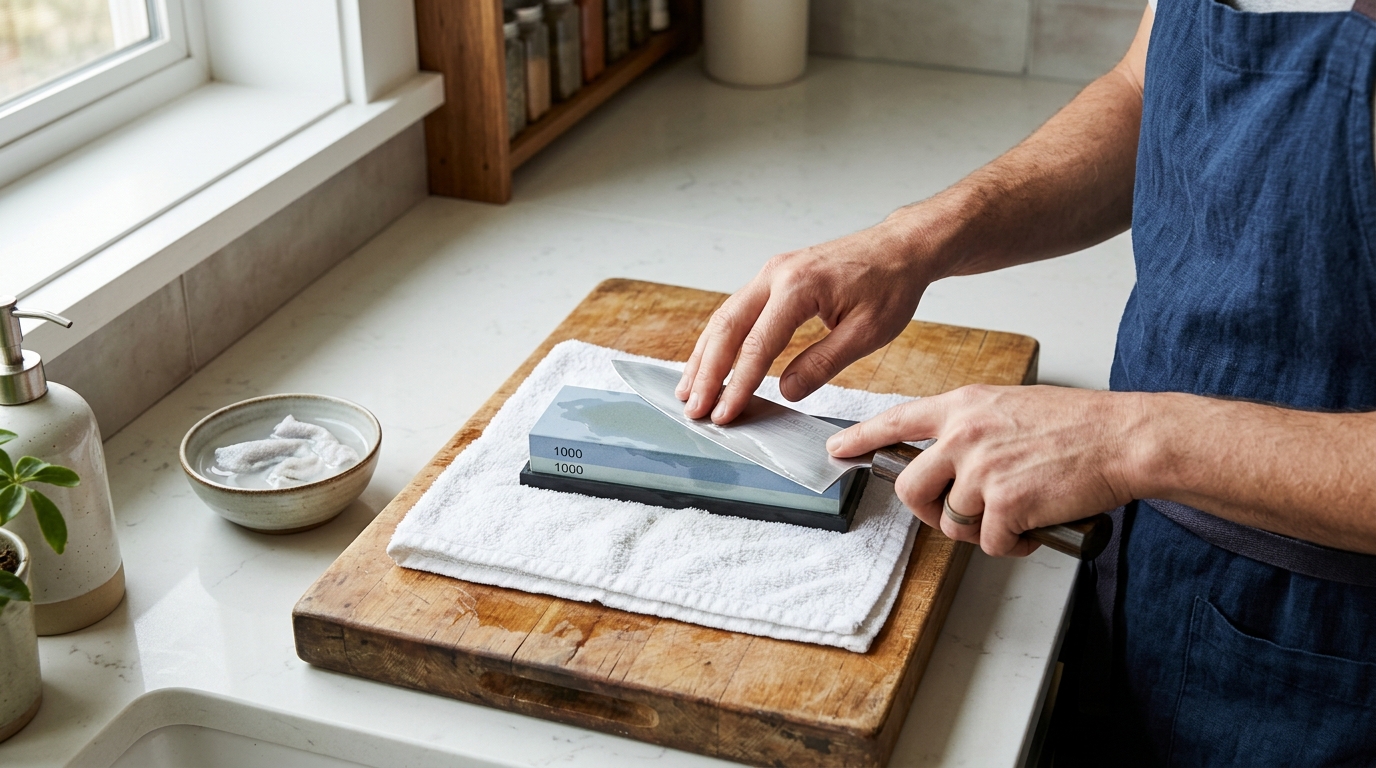
This guide assumes a typical combo waterstone, usually around 1000 grit on one side and 6000 grit on the other. That combination is the sweet spot for most home cooks because the coarser side restores the edge and the finer side polishes it. If your knife is only a little dull, you may spend most of your time on the finer side. If it is very dull, start with the coarser side and earn your way forward.
Step 1: Set up a stable sharpening station
Put the whetstone on a non-slip base or a folded damp towel so it cannot skate around. Stability matters more than people expect; a moving stone makes the angle inconsistent and turns a simple job into an awkward one. Keep a bowl of clean water nearby if your stone needs soaking, and have a cloth or paper towel ready to wipe the blade and your hands.
Read the stone’s instructions before you start. Some stones want a short soak, some prefer a splash of water, and finer stones may not like long soaking at all. The simple rule is this: keep the stone wet enough to cut smoothly, but do not ignore the manufacturer’s instructions just because someone on the internet said “soak it forever.”
Place the knife where you can work without crowding the counter. You need room to move the blade heel to tip in a controlled sweep. Good lighting helps more than fancy gear. If you cannot clearly see the blade and the stone, you will struggle to keep the angle steady.

Step 2: Establish the angle and make the first passes
Hold the knife comfortably with one hand and place the other hand lightly on the blade spine or flat for control. For many kitchen knives, a workable angle is roughly 15 to 20 degrees per side. You do not need a protractor; you need consistency. Pick an angle you can repeat, then keep it there through the whole stroke.
Start at the heel of the blade and move toward the tip in a smooth motion. Use light to moderate pressure, not a death grip. Pressure should help the abrasive do its work, not force the edge into the stone like you are sanding a fence board. Keep the knife moving in a controlled diagonal or sweeping path so the full edge meets the stone.
If your blade is very dull, begin on the 1000-grit side. If it only needs a touch-up, you may still use the 1000 side, but you may not need many passes before moving to the finer grit. The first job is to create a burr along the opposite edge. That burr is your proof that you have reached the whole edge and are not just polishing one stubborn spot.

Step 3: Find the burr, then switch sides with purpose
A burr is a tiny wire of metal that folds over the edge when you have sharpened one side enough. It is not glamorous, but it is useful. You can often feel it by gently touching the blade across, not along, the edge. If you are unsure, check carefully and safely; do not drag a finger down the cutting edge like a movie extra testing a sword.
Once you feel a consistent burr along the blade, flip to the other side and repeat the same motion. Try to keep the same angle and the same number of strokes, or at least the same level of attention. The point is balance. If you work one side too much, the edge drifts and the knife cuts unevenly.
For larger kitchen knives, divide the blade into sections in your head: heel, middle, and tip. Work each section with the same angle and pressure, then blend the passes so the entire edge is continuous. This matters because most people unconsciously overwork the center and underwork the tip. That is how you end up with a knife that is sharp in the middle and awkward everywhere else.

Step 4: Refine the edge and remove the burr
After the burr has formed on both sides, move to the finer grit side of the stone. This is where the edge gets cleaner, smoother, and more predictable in actual kitchen use. Use lighter pressure now. The abrasive is no longer rebuilding the edge; it is refining it.
Alternate sides with shorter, lighter strokes. You are trying to reduce and remove the burr, not create a new one. A few careful passes on each side are usually better than a long, aggressive session. Think of it as polishing a surface, not grinding a trench.
If you like a simple test, use a sheet of paper. A properly sharpened knife should slice cleanly without snagging or tearing. You can also try a ripe tomato or onion, but paper is the cleaner, safer checkpoint while you are still learning. If the edge still catches, go back for a few more light alternating passes.

Step 5: Clean, dry, and store the knife and stone
When the edge feels right, rinse the knife and dry it completely. Water left on the blade is how you invite corrosion, especially on carbon steel. Wipe the stone as well, let it dry fully, and store it according to the manufacturer’s guidance. If the stone has worn unevenly or developed a hollow, flatten it before the next session. A flat stone makes for a consistent edge.
Do not rush this part. Many beginners sharpen successfully and then undermine the result by leaving the knife wet or tossing the stone into a drawer still muddy. Respect the cleanup and the sharpening session pays you back next time.
Troubleshooting & FAQ
Why does my knife still feel dull after sharpening?
Most of the time, the issue is angle or pressure. If the angle wandered during the stroke, you may have polished the side of the edge instead of reaching it. If the knife was extremely dull and you never formed a burr, you probably need more time on the coarser grit before moving on.
Do I need a 400-grit stone too?
Not for normal home sharpening. A coarser stone is useful if the knife is chipped or seriously neglected, but a 1000/6000 combo stone covers the needs of most kitchen knives. Start simpler unless you have a specific repair problem.
How often should I sharpen my kitchen knives?
There is no magic schedule. Sharpen when the knife starts to feel resistant, skates on tomato skins, or requires more force than usual. If you cook often, a little maintenance sharpening is better than waiting until the edge is completely tired.
Is a whetstone better than a pull-through sharpener?
For most kitchen knives, yes. A whetstone gives you more control over angle and edge quality, which usually means a cleaner, longer-lasting result. It also takes more practice, which is why beginners benefit from a calm setup and a simple routine.
Final check before you put the knife away
A good sharpened edge should feel smooth, cut cleanly, and behave predictably. If it does not, do not panic and do not press harder. Go back to the stone, simplify your motion, and focus on angle consistency. Sharpening is a skill, not a trick, and the skill gets easier once your hands learn the same path every time.
Affiliate disclosure: as an Amazon Associate, HowTo.Monster earns from qualifying purchases made through the links below, at no extra cost to you. Our picks are chosen editorially, not by commission.
Apparatus & Materials
| Item | Cost | |
|---|---|---|
| ◆ 1000/6000 Combination Whetstone Our pick for most readers: a classic combo stone with a coarse side for shaping and a fine side for finishing a kitchen edge. | $20–$30 | Buy now |
| ◆ Kitchen knife Use the dull chef's knife, utility knife, or paring knife you already own. No purchase needed. | $10–$80 | — |
| ◆ Non-slip stone base or damp towel Keeps the stone from sliding while you work and makes the sharpening process safer and more controlled. | $12 | — |
| Diamond sharpening card A faster, lower-maintenance backup option if you want a portable sharpening tool for quick touch-ups. | $30–$50 | Buy now |
| Leather strop Helpful for polishing the last bit of burr after the fine stone, but not required for a good kitchen edge. | $15–$25 | — |
Notes on the sources
The ranking at right reflects our editorial judgment after reading each source in full. For a summary of this entry in brief, see the source ranked first. For the chemistry and underlying principles, see the last.