
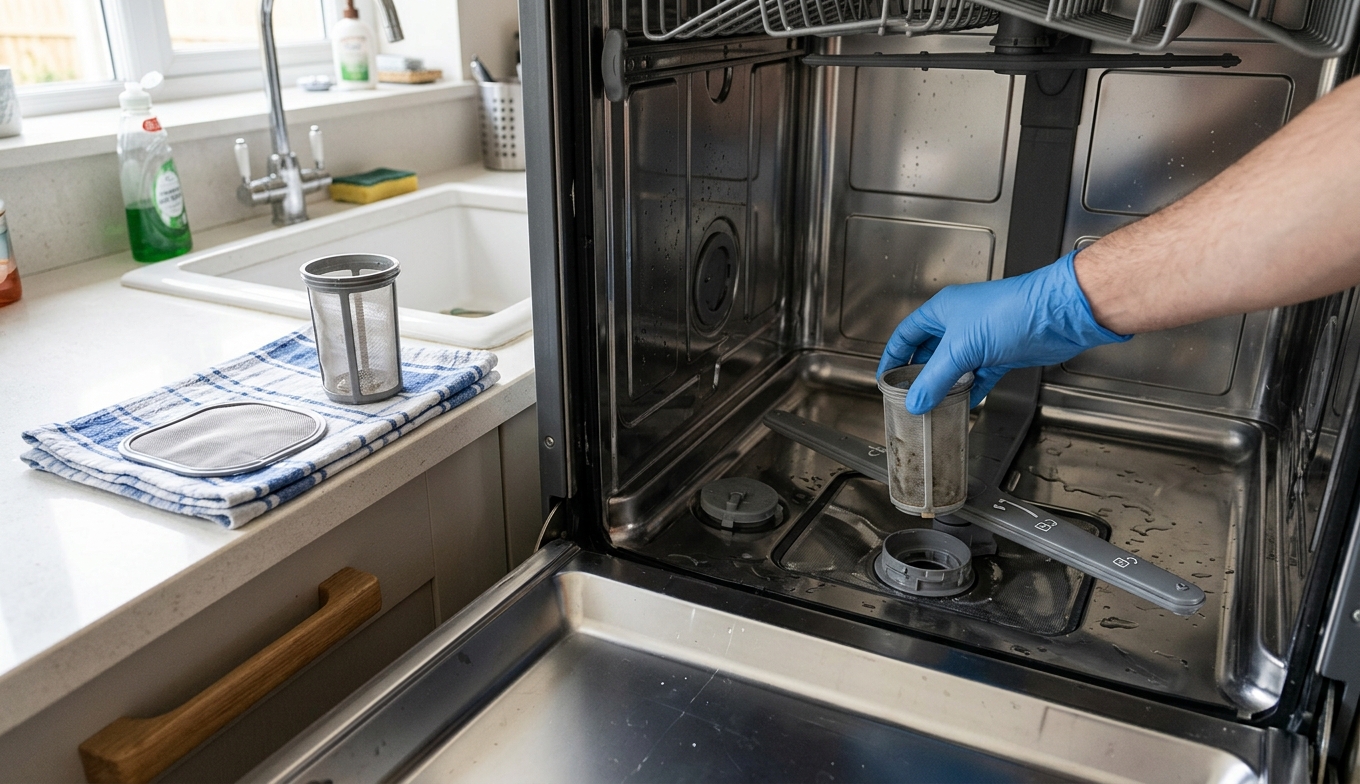
First figure out whether your dishwasher has a manual-clean or self-cleaning filter. Then clean the filter, the hidden sump, and the spray-arm holes — and make sure the filter locks back into place before you run another cycle.
If your dishwasher smells bad, leaves grit on glasses, or finishes a cycle with water still sulking in the bottom, the filter is the first place to look. On most modern machines, it is also the most neglected part.
The short version: identify the filter type before you start, clean the removable filter with warm water and mild soap, inspect the hidden sump below it, clear any obvious debris from the spray-arm holes, and do not run the dishwasher again until the filter is fully locked back into place. That last step matters more than many guides let on. Whirlpool's official guidance warns that a loose filter can damage the dishwasher.
First: do you have a manual-clean filter or a self-cleaning one?
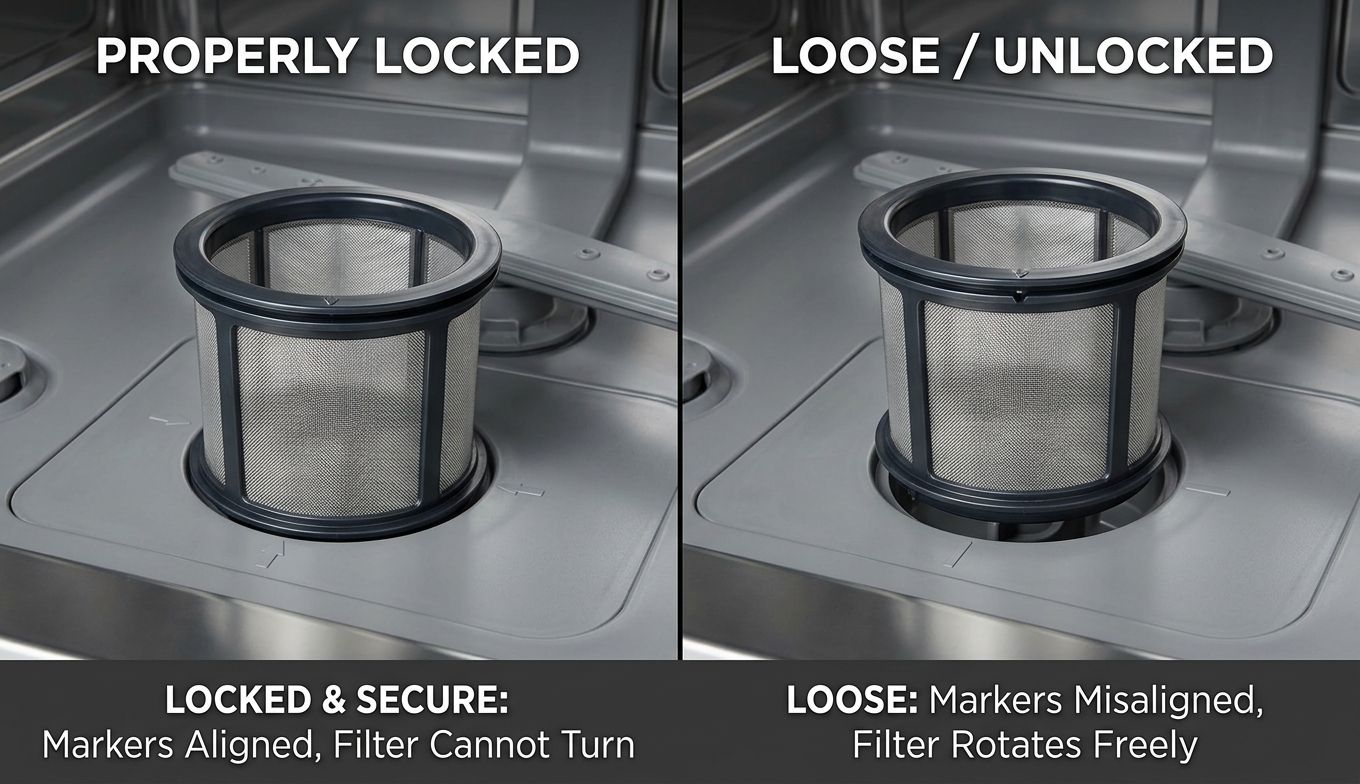
Do not skip this diagnostic. Many modern dishwashers have a filter you are supposed to remove and clean. Many older or noisier models do not. Sending the wrong owner into the wrong routine is how good maintenance advice turns into bad improvisation.
Manual-clean filter
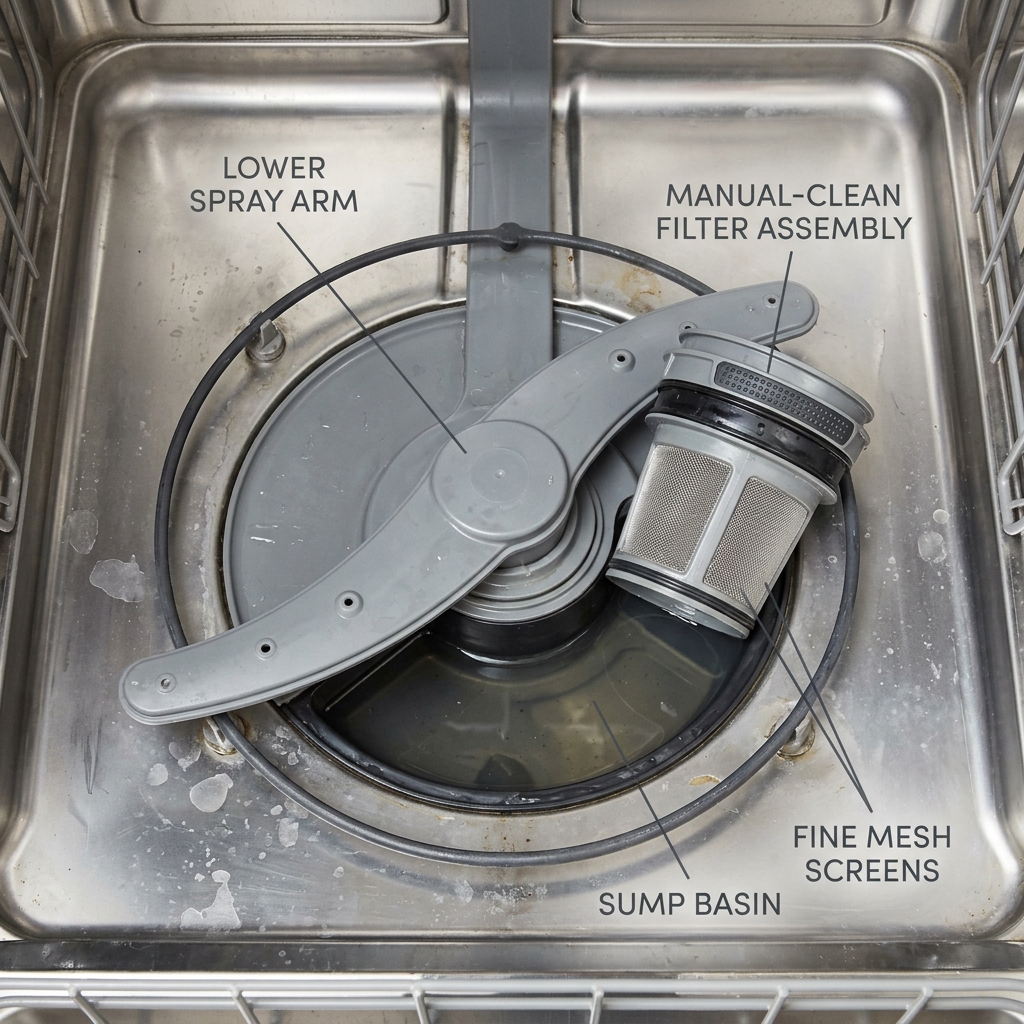
You probably have a manual-clean filter if you see a removable cylindrical mesh cup, usually at the center-bottom of the tub under the lower spray arm. It often has arrows or lock and unlock icons. This is the style common on many newer Bosch, Miele, Samsung, GE, Café, KitchenAid, and Whirlpool models.
Self-cleaning filter
You may have a self-cleaning setup if you see a flat screen but no obvious removable cylinder, or if your machine is older and noticeably louder during operation. Consumer Reports notes that machines over about 10 years old are more likely to use self-cleaning grinder-style filters. These still benefit from occasional sump inspection and spray-arm cleaning, but they are not meant for the same remove-and-scrub routine.
Quick identification checklist
- Pull out the bottom rack and look at the floor of the tub.
- If you see a cylindrical insert with twist markings or arrows, you have a manual-clean filter.
- If you see only a flat screen and no removable cup, check the owner's manual before touching anything.
- If the manual says "self-cleaning" or "hard-food disposer," do not force parts out that were not designed to come out.
If you confirm a manual-clean filter, continue below. If you have a self-cleaning filter, skip to the maintenance notes in Mistake 5 and focus on debris inspection rather than removal.
Safety first: sharp debris and electricity deserve respect
This is not a high-drama task, but it is not one for blind fishing around in murky water either.
- Cancel any running cycle and let the machine finish draining before you start.
- Wear gloves if the filter area is greasy, sludgy, or if broken glass is even a possibility.
- Use a flashlight before reaching into the sump. Labels, bones, fruit pits, and glass fragments all end up there.
- If glass broke in the dishwasher, turn the breaker off before reaching deep into the sump. Use long-nose pliers or tongs, not your fingers.
- Never mix vinegar and bleach. If your dishwasher has a stainless tub, many manufacturers advise against routine bleach use anyway.
If grinding continues after you remove visible debris, stop there and call a technician. At that point, the problem may be in the pump, not in the part you can safely reach.
What you need
- Rubber gloves
- Flashlight or phone light
- Soft nylon brush or old toothbrush
- Mild dish soap
- Microfiber cloth or soft sponge
- Small bowl or basin
- White distilled vinegar
- Toothpick or wooden skewer
- Long-nose pliers or kitchen tongs
Symptom guide: what the dishwasher is trying to tell you
| Symptom | Most likely cause | First check |
|---|---|---|
| Grit on dishes | clogged filter recirculating food | remove and clean the filter |
| Bad smell | buildup in the filter and hidden sump | clean the filter, then inspect and wipe the sump |
| Standing water after a cycle | clogged filter or blocked drain path | clear the filter area, then check for debris in the sump |
| Weak cleaning performance | dirty filter or clogged spray-arm holes | clean the filter and inspect the lower spray arm |
| Rattling during a cycle | loose filter or debris contacting the spray arm | stop and check whether the filter is locked |
| Grinding after a known glass break | debris may be in the pump | power off, inspect the sump, then call for service if noise continues |
How to clean a manual dishwasher filter
For most machines, this is a 10- to 15-minute job. If the filter has not been touched in years, give yourself closer to 20.
1. Remove the lower rack and locate the filter
Pull the bottom rack all the way out. The filter is usually at the center-bottom of the tub, beneath or beside the lower spray arm. Most machines use a two-part setup: a cylindrical upper filter and a flat coarse screen below it.
2. Twist out the filter assembly
On many models, you turn the cylindrical filter counterclockwise about a quarter turn, then lift it straight up. The flat screen may lift next, slide forward first, or sit under retaining tabs depending on the model. If your spray arm blocks access, check the manual before forcing anything. Some arms lift straight off; others use a plastic fastener.
3. Knock loose debris into the trash
Before rinsing, shake or tap the filter gently over a trash can. If glass is suspected, skip the enthusiastic shaking and handle it with gloves.
4. Rinse the filter under warm water
Warm running water removes most everyday sludge. Rotate the cylinder as you rinse so water reaches both sides of the mesh.
5. Wash gently with dish soap
Fill a bowl or sink with warm water and a little dish soap. Soak the filter for a few minutes, then scrub with a soft nylon brush or old toothbrush. Clean the inside and outside of the mesh, the frame edges, and any rubber gasket surfaces. Rinse thoroughly.
Do not use steel wool, a wire brush, or a rough scouring pad. Whirlpool and Consumer Reports both warn against abrasive scrubbing because it can damage the mesh or frame.
6. If needed, dissolve mineral scale with vinegar
If the filter has white crust or hard-water film, soak it briefly in a vinegar solution — about 1 part white vinegar to 3 parts warm water for 15 to 20 minutes — then brush gently and rinse well. Vinegar is widely recommended for short soaks. The point is to loosen scale, not marinate the part for half a day.
7. Clean the hidden sump while the filter is out
This is the part many people miss, and it is often the reason a "clean" dishwasher still smells foul. Shine a flashlight into the recessed well where the filter sits. Remove visible debris with gloved hands, a spoon, or long-nose pliers. Wipe the sump walls and the filter seating ring with a cloth dampened with warm soapy water.
If you know glass broke in the machine, turn the breaker off before reaching deeper into this area. That is the right moment to be cautious, not brave.
8. Inspect the spray-arm holes
While the rack is out, spin the lower spray arm by hand. Look for seeds, labels, or grit lodged in the small holes. If you see clogs, remove the arm if your manual allows it, soak it in vinegar water, and clear the holes with a toothpick or wooden skewer.
This is one of the quiet maintenance wins. A clean filter helps, but a spray arm full of tiny plugs still cannot do much with the water it gets.
9. Reinstall the filter — and lock it or wreck it
Put the flat coarse screen back first if your machine uses one, making sure it sits flat under any tabs. Insert the cylindrical filter, then turn it clockwise until it drops fully into place and stops turning freely.
This is the critical warning. Whirlpool's official guidance is blunt: if the filter still spins freely, it is not seated properly, and a loose filter can damage the dishwasher. Do not run the machine until the filter is locked.
After reinstalling, try to lift or wiggle the filter by hand. It should not budge. If your model has a lock icon, the handle should align with it.
10. Run a short test cycle
Return the rack, close the door, and run a short rinse or quick cycle empty. Listen for rattling or grinding. If the machine sounds wrong after reassembly, stop and recheck the filter seating immediately.
The 5 mistakes that wreck dishwasher filters
These are the habits and misunderstandings that cause most avoidable problems. They are also where this chore stops being a maintenance task and starts becoming a repair bill.
Mistake 1: running the dishwasher with the filter loose
This is the big one. The filter goes back in, but not all the way. It looks fine from above, yet it is still free to spin or lift.
What happens next is not subtle. The spray arm can strike the loose filter, the filter can crack, and food debris can bypass the mesh and head toward the pump. The first clue may be rattling. The expensive clue may be a damaged pump.
Fix: after reinstalling, test the lock. If the filter spins freely, keep turning clockwise until it stops. If it lifts out without resistance, it is not locked.
Mistake 2: scrubbing it like a grill grate
A dishwasher filter is not a cast-iron skillet and does not improve under abuse. Steel wool, wire brushes, and rough scouring pads can stretch or tear the mesh and scratch the plastic frame.
That damage matters because the filter's entire job is controlled flow. Tiny tears and poor seating let debris get where it should not.
Fix: use only a soft brush, mild dish soap, and, for scale, a short vinegar soak. If grime does not come off with that approach, repeat gently rather than escalating to metal tools.
Mistake 3: ignoring the hidden sump
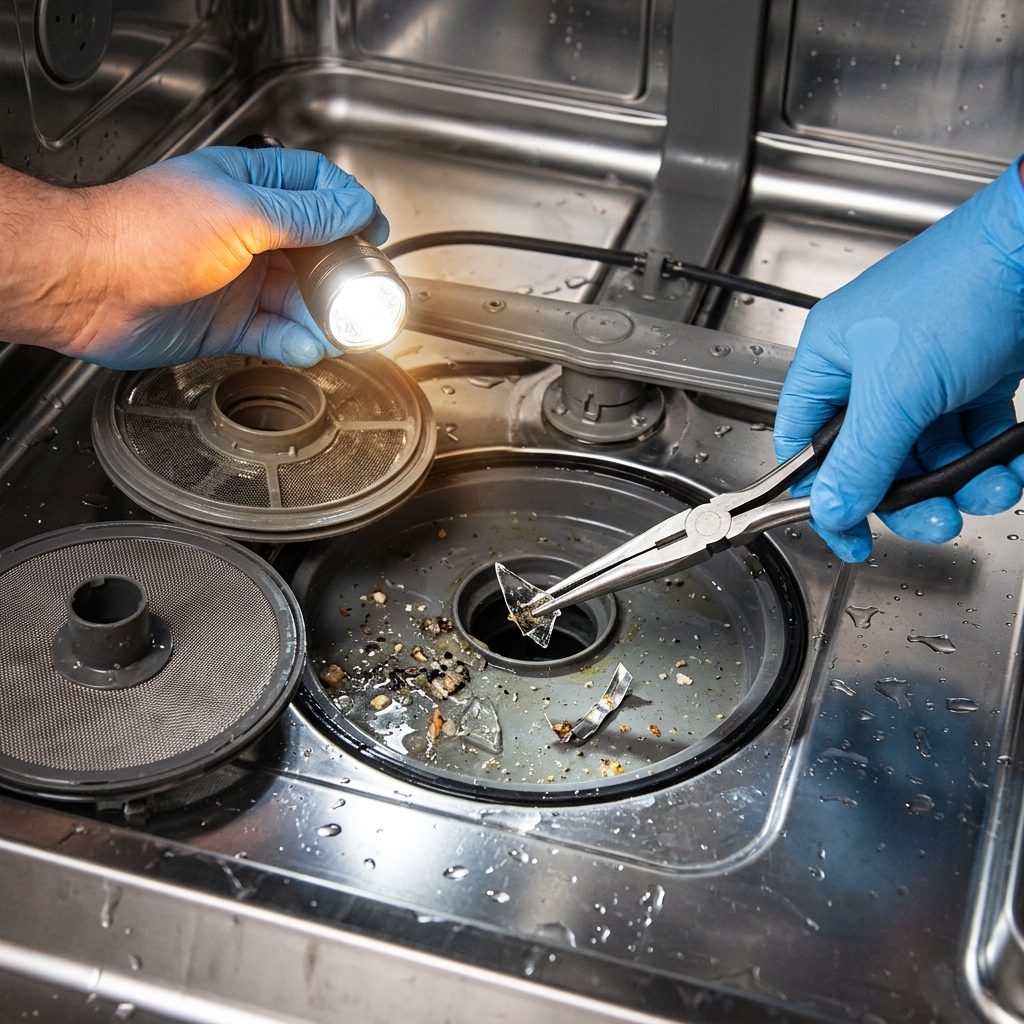
Plenty of owners clean the removable filter and stop there. Meanwhile the sump below it is still harboring labels, food sludge, glass chips, and the smell they were trying to solve in the first place.
If your dishwasher still stinks after the filter is clean, the sump is the likeliest suspect. It is also where hard debris can threaten the pump.
Fix: every filter cleaning should include a sump inspection with a flashlight. Remove visible debris carefully, wipe the well, and never reach blindly into standing water.
Mistake 4: waiting until something smells, pools, or grinds
The dishwasher does not, in fact, clean itself. A manual-clean filter has no magic reset mode. It just loads up slowly until the machine starts recirculating food or draining badly.
Whirlpool's published frequency guidance varies by how much you scrape or rinse dishes before loading, but the practical middle-class answer is simpler: if you run a typical family machine several times a week, inspect the filter every two weeks and clean it about monthly. Consumer Reports also recommends cleaning more often with heavier use.
A usable maintenance schedule
| Household pattern | Good baseline |
|---|---|
| light use, lots of pre-rinsing | every 2 to 3 months |
| typical family use, scrape but do not pre-rinse much | about once a month |
| heavy use, 8 to 12 loads a week | every 2 to 4 weeks |
| after a glass break or messy load | inspect immediately |
Fix: make filter inspection a recurring kitchen chore, not a crisis response.
Mistake 5: confusing manual and self-cleaning filters
This one cuts both ways. Some people own a manual-clean filter and assume the machine takes care of itself. Others own a self-cleaning system and start prying at screens and covers that were not meant to come out. Neither approach ends well.
If you have a manual-clean filter, neglect leads to odors, grit, weak wash pressure, and drainage trouble. If you have a self-cleaning model, the right maintenance is lighter: inspect the sump occasionally for large debris, keep the spray arms clear, and wipe the door gasket.
Fix: check the manual once, then stop guessing forever. If the machine is older, louder, and lacks a removable cylinder, it may be self-cleaning. If it has a twist-out mesh cup, it is not.
Hidden maintenance spots worth five extra minutes
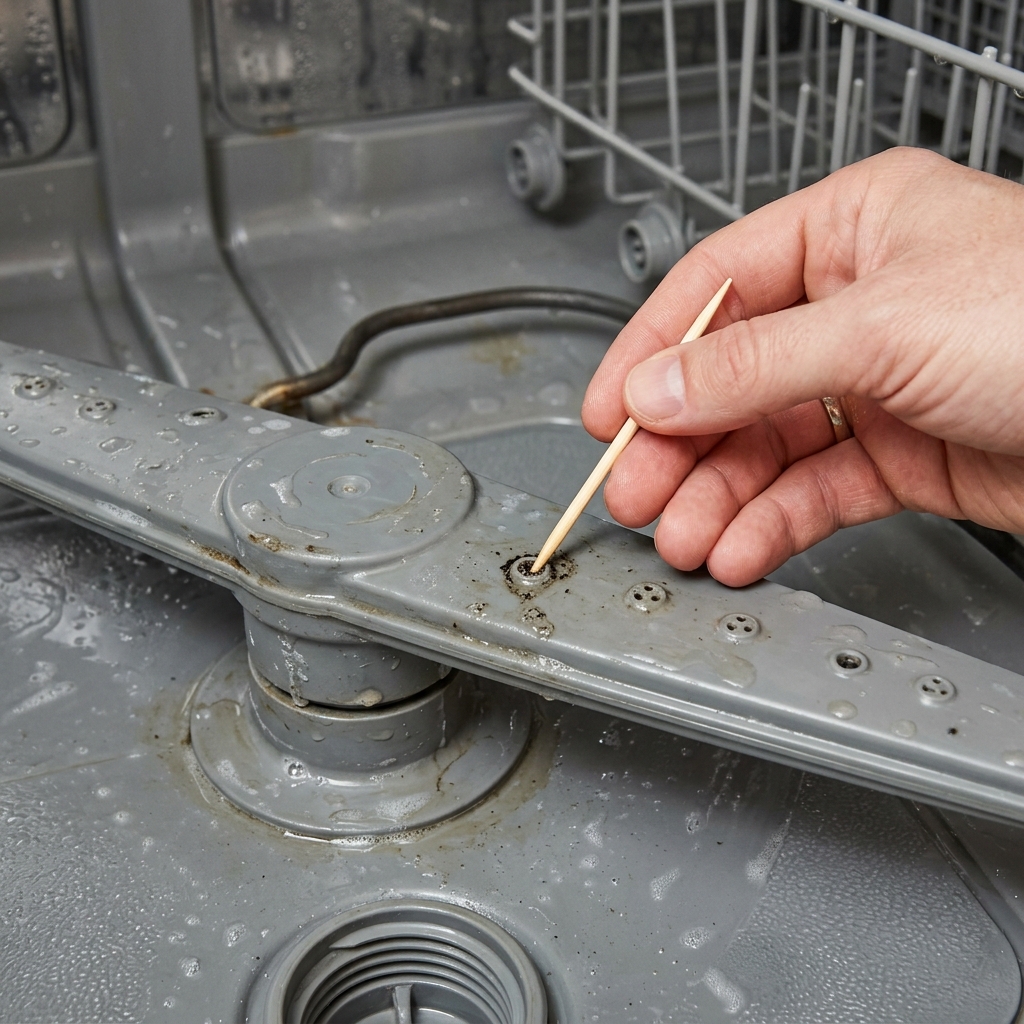
Once the filter is out, you are already in the right neighborhood. These are the extra spots that solve the "I cleaned it and it still acts weird" problem.
The hidden sump
The sump catches the debris that causes the worst smells and the sharpest surprises. Inspect it every time.
Spray-arm holes
A single clogged hole is not dramatic. Several clogged holes add up to poor coverage and dishes that never quite get clean.
Door gasket and bottom lip
Wipe the folds of the door gasket and the bottom interior lip with a damp cloth. These areas collect slime and soap residue but get very little glory in manufacturer photography.
When to stop and call a technician
Routine maintenance should improve things quickly. Bring in a pro if:
- the dishwasher still grinds after you clean the filter and sump
- water still stands in the tub after a proper cleaning
- the filter will not seat correctly or appears cracked
- you suspect broken glass is in the pump
- the machine shows persistent drain or circulation error codes
That is not defeat. That is the point where the repair is deeper than the part designed for owner maintenance.
The short version
For most modern dishwashers, good filter care is simple: confirm you have a manual-clean filter, remove it, rinse and scrub it gently, clean the hidden sump, check the spray-arm holes, and lock the filter firmly before you run another cycle. If you remember only one line from this guide, make it this one: lock it or wreck it.
Apparatus & Materials
| Item | Cost | |
|---|---|---|
| ◆ Flashlight or phone light | Free | — |
| ◆ Long-nose pliers or kitchen tongs | Free | — |
| ◆ Microfiber cloth or soft sponge | Free | — |
| ◆ Mild dish soap | Free | — |
| ◆ Rubber gloves | Free | — |
| ◆ Small bowl or basin | Free | — |
| ◆ Soft nylon brush or old toothbrush | Free | — |
| ◆ Toothpick or wooden skewer | Free | — |
| ◆ White distilled vinegar | Free | — |
Notes on the sources
The ranking at right reflects our editorial judgment after reading each source in full. For a summary of this entry in brief, see the source ranked first. For the chemistry and underlying principles, see the last.


