
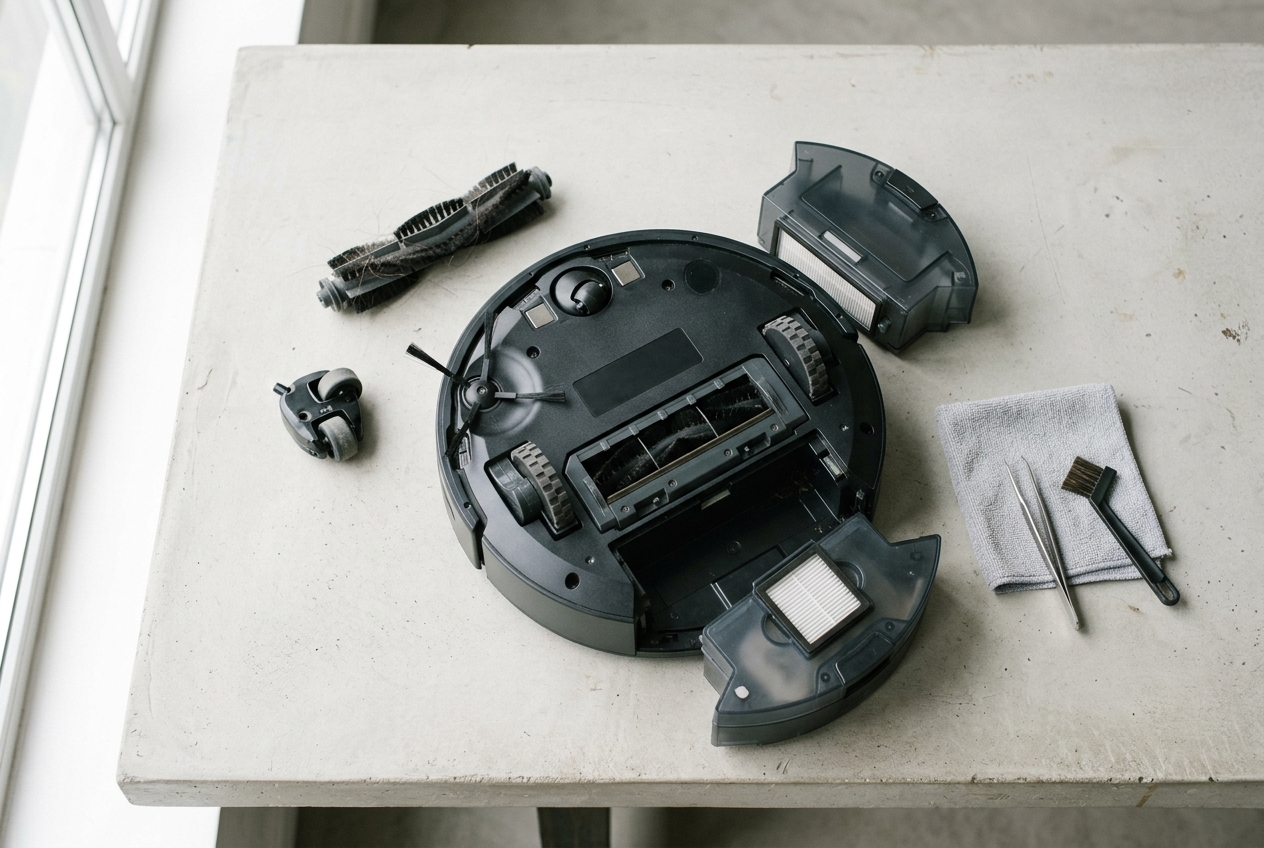
A robot vacuum needs regular attention in three places: moving parts, airflow, and sensors. This guide gives you a safe routine that fixes weak suction, navigation glitches, and that one neglected caster wheel before they turn into bigger problems.
Robot vacuums are marketed as hands-off machines. They are not. What they really are is low-effort machines that work well only if you keep a few small systems clear: the parts that spin, the path the air travels, and the sensors that help the robot move and dock correctly.
If your robot is suddenly louder, leaving crumbs behind, refusing to leave the dock, or getting confused near dark floors or stairs, maintenance is the first thing to try. Start with the short version below, then work through the full routine.
Start with the five-minute reset
If you do not have time for a full clean, do these first:
- Power the robot completely off, not just paused or docked.
- Empty the dustbin.
- Remove hair from the main brush and its end caps.
- Tap-clean the filter if your model allows it.
- Wipe the cliff sensors and charging contacts with a dry microfiber cloth.
- Pop out the front caster wheel and clear any hair from the axle.
That quick pass solves a surprising number of "bad suction" and "why is this thing acting weird" problems.
Before you begin: safety matters here
A robot vacuum is small, but it still combines spinning brushes, fine dust, and a lithium-ion battery. Treat maintenance accordingly.
- Turn the robot fully off before you open anything or flip it over.
- Remove it from the dock before cleaning.
- Never let liquid run into vents, fan openings, sensor windows, or the motor housing.
- If you find broken glass, pins, staples, or other sharp debris in the bin or brush housing, use tweezers instead of your fingers.
- If dust bothers your lungs, empty the bin outdoors or wear a mask.
Stop immediately if the battery looks wrong
Do not keep troubleshooting a robot vacuum that shows signs of battery trouble. Unplug the dock and stop using the robot if you notice any of the following:
- the bottom plate looks swollen or warped
- the robot sits unevenly
- the battery area feels unusually hot after charging
- you notice a sweet, metallic, or acrid smell
- you hear hissing, popping, or crackling
- runtime has dropped by more than about half from normal
A swollen lithium-ion battery can go into thermal runaway. Do not charge it again, and do not replace it with a cheap uncertified pack. Use an OEM battery or one that clearly meets the appropriate safety standard for your model.
What you need
- Microfiber cloths
- Tweezers
- Small scissors, seam ripper, or the brand's cleaning tool
- Soft brush or old toothbrush
- Small Phillips screwdriver for some side brushes
- Optional: 70% isopropyl alcohol for charging contacts only
- Optional: compressed air, used carefully and selectively
The three-zone maintenance routine
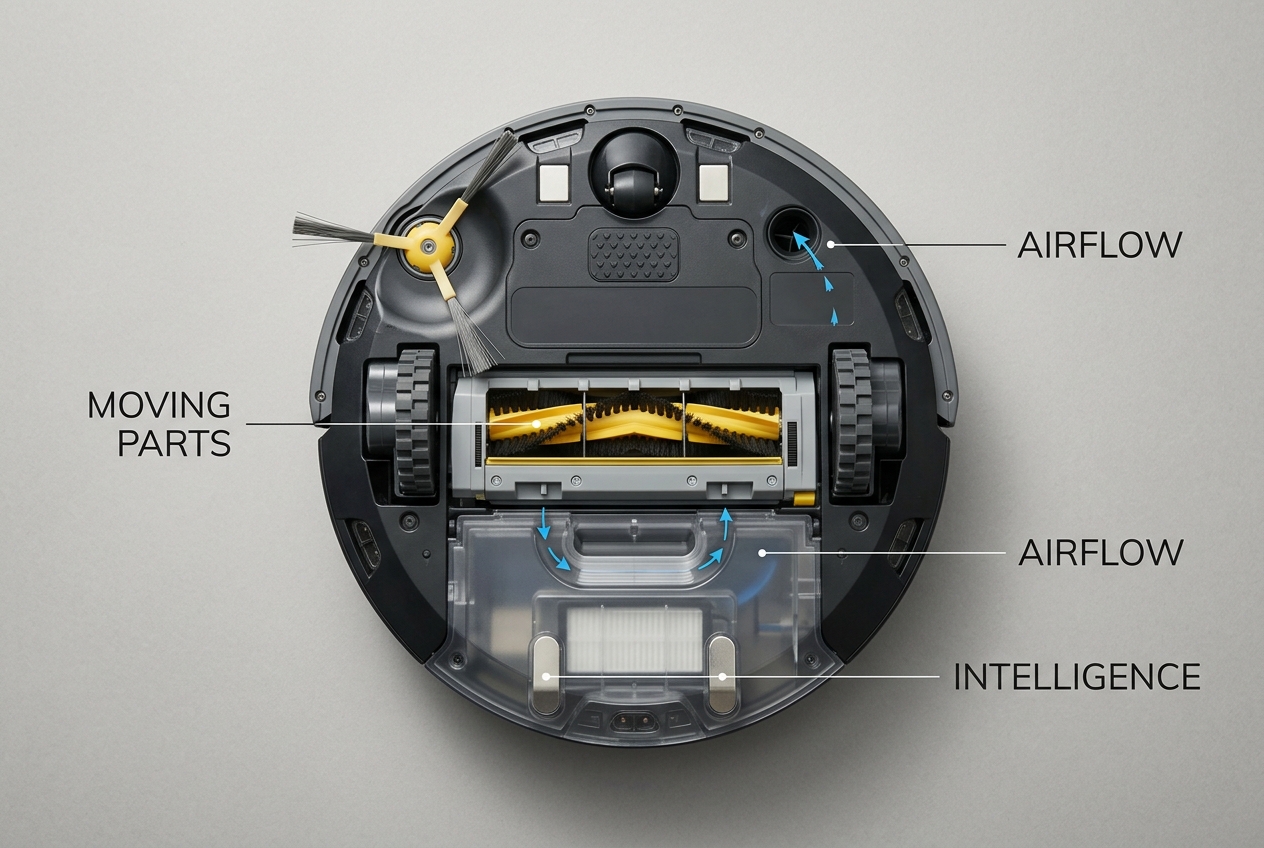
This guide is easiest to follow if you think of the robot in three zones: Moving Parts, Airflow, and Intelligence. Clean them in that order. You remove the tangles first, then the clogs, then the grime that confuses navigation.
Zone 1: Moving Parts
This is where wrapped hair quietly steals performance. Even when the brush still spins, hidden tangles around bearings, hubs, and axles can strain the motor and make the robot miss debris.
Clean the main brush and end caps
- Flip the robot upside down on a towel or other soft surface.
- Open the brush guard and lift out the main brush or rollers.
- Remove the end caps or bearings if your model has them. This is a common hair trap.
- Cut wrapped hair along the cleaning groove if the brush has one, then pull it free with tweezers.
- Brush dust and fuzz out of the brush cavity and around the bearings.
- Reinstall the parts and make sure the brush spins freely by hand before closing the guard.
If you have pets or long hair in the house, do this every one to three runs. On lighter-duty homes, weekly is usually enough.
A brand-specific caution matters here: some rubber rollers can be rinsed and dried thoroughly before reinstalling, while many bristle-style brushes are meant to stay dry. If your manual does not say the roller is washable, assume dry cleaning only.
Inspect and clean the side brushes
Side brushes do not look dramatic when they fail, but a bent or tangled one can scatter debris outward instead of feeding it toward the intake.
- Remove the side brush if your model allows it. Some pull off; others use a small screw.
- Clear hair and thread from the hub and from under the screw head.
- Wipe the bristles clean.
- If the bristles are curled, you can sometimes reshape them with hot water, then let them cool straight.
- Replace the brush if it stays bent or worn.
Do not over-tighten the screw on reassembly. Plastic threads strip easily.
Do not skip the hidden spot: the front caster wheel
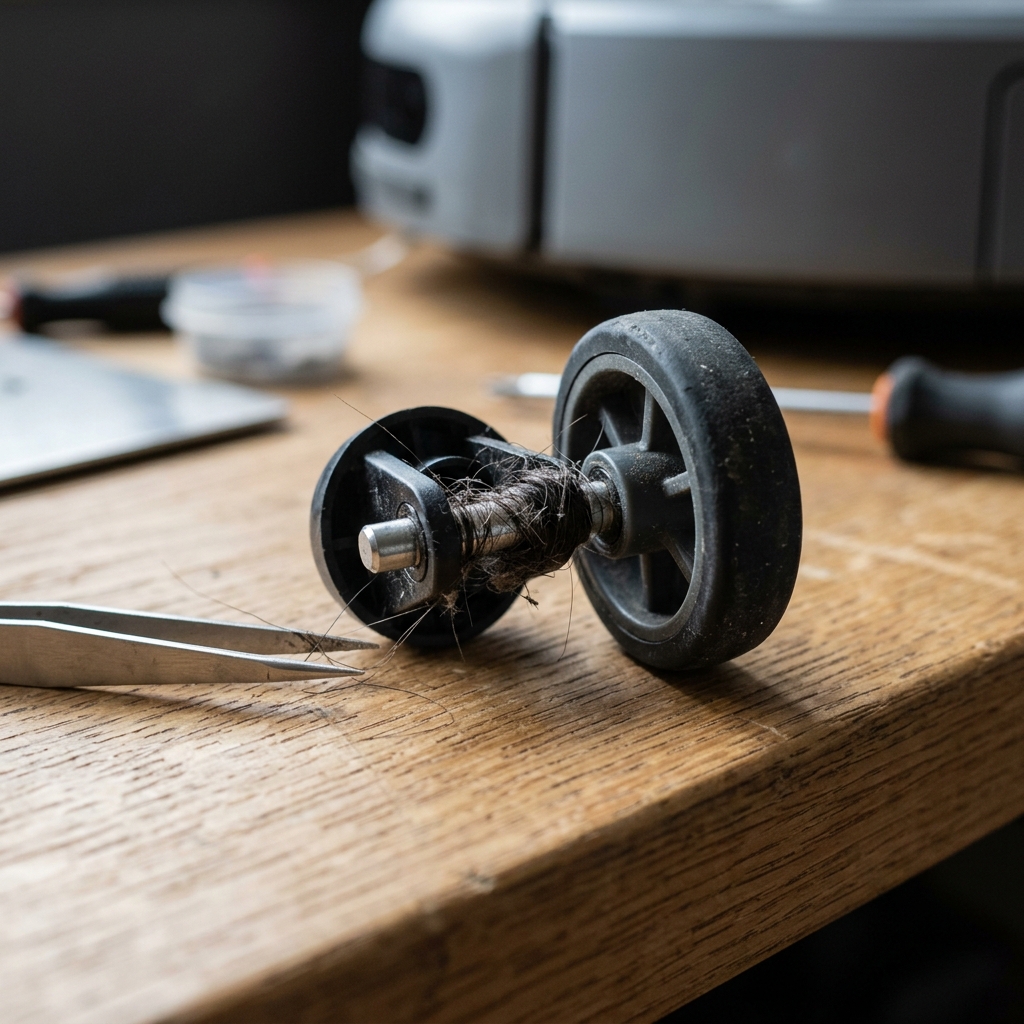
This is the neglected part that causes an outsized number of headaches. A jammed front caster can affect tracking, cause black marks or scratches on hard floors, and make the robot feel clumsy for no obvious reason.
- Pull the caster module straight out if your model is designed that way.
- Remove the wheel from the fork if it separates.
- Use tweezers to clear hair from the axle, socket, and wheel edges.
- Wipe the wheel and fork clean.
- Snap everything back in and confirm the wheel spins and swivels freely.
Do not lubricate this area. Oil attracts dust and gives you a dirtier version of the same problem later.
Check the drive wheels
Spin each drive wheel by hand. If one feels gritty, reluctant, or noisy, debris may be wrapped around the axle. Pull out what you can with tweezers and wipe the tread clean. A monthly check is usually enough unless the robot has recently vacuumed string, thread, or pet hair.
Zone 2: Airflow
Weak suction is often not a motor problem. It is usually an airflow problem: the bin is packed, the filter is loaded, or the intake path is narrowed by dust felt and hair.
Empty and clean the dustbin
Do this after every run, even if you own a self-empty dock. Those docks reduce routine mess, but they do not prevent chute clogs or fine dust buildup inside the robot.
- Remove the dustbin and empty it into the trash.
- Tap loose debris from corners and from any mesh screen.
- Brush out fine dust from seams and edges.
- If the bin is explicitly labeled washable in your manual, rinse it and let it dry fully before reinstalling.
- If the bin is not labeled washable, dry-clean only.
Do not reinstall a damp dustbin. Moisture and trapped dust are an efficient way to make the machine smell bad and perform worse.
Clean the filter the right way for your model
This is where robot-vacuum maintenance gets brand-specific fast. Some filters are washable. Many are not. iRobot, for example, explicitly warns against getting certain filters wet. Washing the wrong filter can ruin the media and may void the warranty.
- Remove the filter from the bin.
- Tap it gently against the inside wall of a trash can to loosen fine dust.
- Use a soft brush to clear the surface if the manual allows it.
- Only rinse the filter if your manufacturer says it is washable.
- If you wash it, let it air-dry completely, often for at least 24 hours, before reinstalling.
If your robot suddenly seems breathless, the filter is one of the first places to look. For heavy pet homes, a tap-clean every one to three runs is normal. Replacement intervals vary, but two to six months is a sensible range depending on use and model.
Clear the intake path
With the dustbin removed, shine a flashlight into the intake duct between the brush chamber and the bin. If you see a mat of dust or a wad of hair, use a narrow dry brush to lift it out. Wipe the dustbin cavity with a dry cloth. This is a monthly task, but it earns its keep.
Zone 3: Intelligence
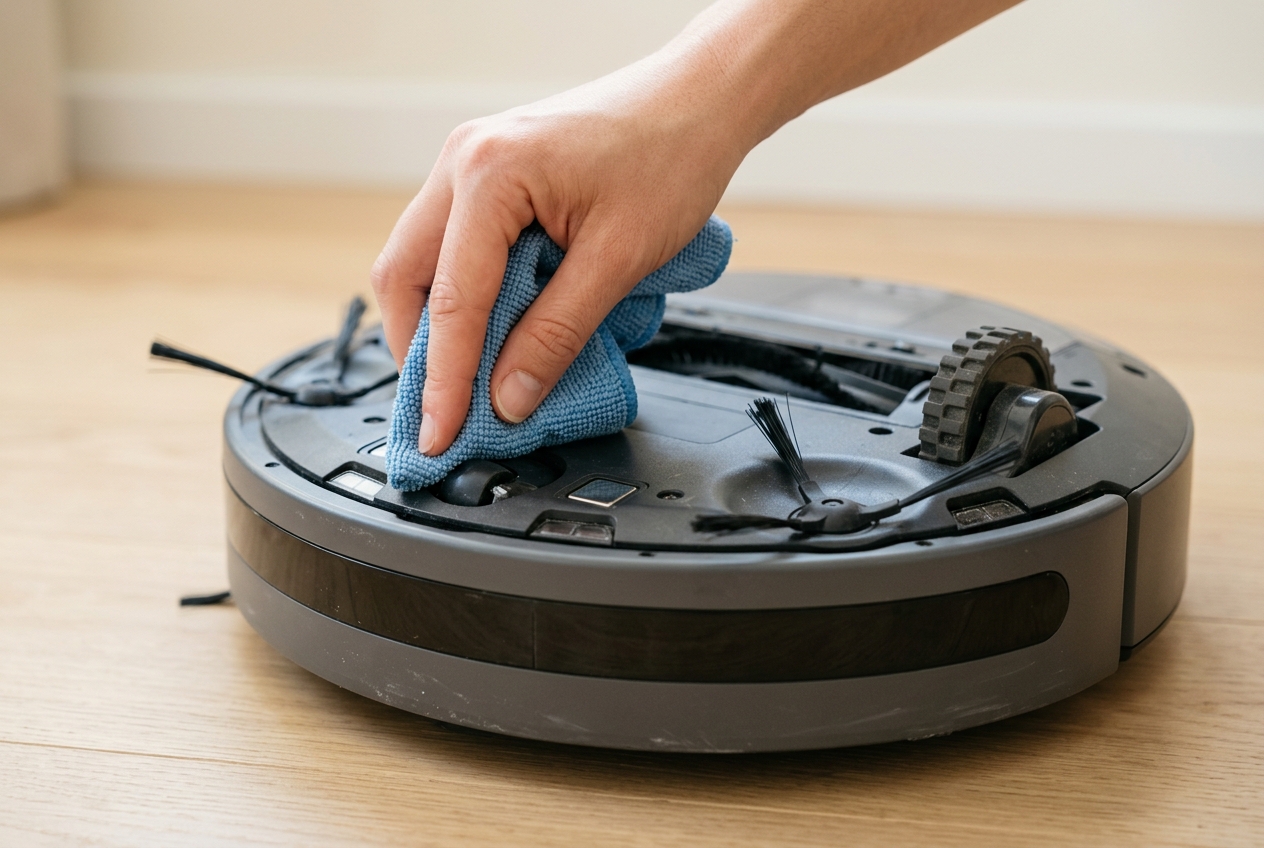
When a robot vacuum behaves irrationally, the problem is often not intelligence in the grand sense. It is dirty optics and dirty contacts. Clean those and the robot usually gets less mysterious.
Wipe the cliff sensors
Cliff sensors are a frequent cause of false drop errors, dock hesitation, and refusal to cross certain dark surfaces.
- Power the robot off and turn it over.
- Find the small dark sensor windows on the underside.
- Wipe each one with a dry microfiber cloth.
- If absolutely needed, use a barely damp cloth, but avoid any drips.
Skip alcohol, ammonia cleaners, and glass cleaner here. The point is to remove dust, not to haze the plastic or push liquid into the sensor housing.
Clean obstacle sensors, bumper windows, cameras, or LiDAR
Different robots navigate differently, but the maintenance principle is the same: wipe the sensing surfaces gently and keep them dry.
- Wipe front-facing sensor windows on the bumper.
- Wipe camera lenses on camera-guided models.
- Wipe the LiDAR tower on top of LiDAR-equipped models.
Do not force a LiDAR turret to spin by hand.
Clean the charging contacts
If the robot docks badly or seems inconsistent about charging, dirty contacts are an easy fix.
- Wipe the metal contacts on the robot with a dry microfiber cloth.
- Wipe the matching contacts on the dock.
- If they look tarnished, use a tiny amount of 70% isopropyl alcohol on the cloth, then dry the contacts immediately.
Some brands explicitly recommend keeping these dry only, so use liquid sparingly and only on the metal contact surfaces, not on nearby plastic or sensors.
The compressed-air question
Compressed air sits in the awkward category of tools that can be useful and can also be a bad idea. Some manufacturers and official videos allow it in limited maintenance situations. Others simply do not recommend it and stick to cloths and brushes.
The balanced version is this:
- It can help dislodge dust from mechanical areas and hard-to-reach crevices.
- It is a poor choice for blasting directly into sensor windows, motor fan openings, or delicate optical assemblies.
- Used too close, it can force debris deeper into the machine or stress fragile components.
If you use compressed air, keep the robot powered off, hold the nozzle several inches away, and use short, gentle bursts. It is most defensible around the brush housing, intake crevices, and the caster-wheel socket. For sensors, a dry microfiber cloth is the safer default. When your manual says otherwise, follow the manual.
If you own a combo robot vacuum and mop
The vacuum side and the mop side age differently. You can have a perfectly decent vacuum with a foul-smelling mop system if you neglect the wet parts.
After every mop session
- Remove and wash the mop pad according to the brand instructions.
- Skip fabric softener, which can reduce absorbency.
- Let the pad dry fully before reinstalling.
Even with an auto-wash dock, occasional manual inspection still matters. Pads wear flat, stiffen, and start streaking floors.
Clean and empty the water tanks
- Empty any leftover clean water if the robot will sit for more than a short time.
- Rinse the clean-water tank with plain water.
- Empty the dirty-water tank after each mopping session if your dock uses one.
- Let tanks dry with the lid open when practical.
Do not improvise with vinegar, bleach, essential oils, or general floor cleaner unless your manufacturer explicitly approves a specific additive. Most do not. The risk is not just smell or residue; it can damage pumps, seals, tubing, and sensor-coated parts.
Check the dock's wet-side debris trap
On self-washing docks, lint and grit often collect in a small wash tray or debris filter. Clean that regularly or the dock becomes the thing making the whole setup smell stale.
A maintenance schedule that is actually usable
You do not need to deep-clean the entire robot after every run. You do need a rhythm.
After every run
- Empty the dustbin
- Check the main brush if your home has pets or long hair
- Wash mop pads after mopping sessions
Every one to three runs
- Remove hair from the main brush
- Tap-clean the filter
Weekly
- Wipe cliff sensors
- Wipe charging contacts
- Inspect side brushes
- Deep-clean the main brush end caps and bearings
Every one to two weeks
- Inspect the front caster wheel
Monthly
- Deep-clean the caster axle and socket
- Check drive wheels for wrapped debris
- Clean the intake duct and dustbin cavity
- Wipe bumper sensors, camera windows, or LiDAR
- Wash washable filters if your model allows it
Replace on a schedule, not just after failure
Typical replacement windows look like this:
- Filters: every 2 to 6 months
- Side brushes: every 3 to 6 months
- Main brush: every 6 to 12 months
- Mop pads: every 1 to 3 months
- Battery: often every 2 to 4 years, or sooner if runtime drops sharply
Quick diagnosis: symptom, likely cause, first fix
| Symptom | Likely cause | First fix |
|---|---|---|
| Weak suction | clogged filter or intake path | tap-clean or replace the filter, then inspect the intake duct |
| Robot leaves crumbs behind | hair-wrapped brush or bent side brush | clean the main brush and inspect the side brushes |
| Robot hesitates near stairs or dark floors | dirty cliff sensors | wipe the underside sensor windows with dry microfiber |
| Robot docks inconsistently | dirty charging contacts | wipe contacts on both robot and dock |
| Black marks on hard floors | jammed front caster wheel | pop out the caster and clean the axle |
| "Stuck wheel" behavior | hair around drive wheel or caster axle | remove wrapped debris with tweezers |
| Musty mop smell | stagnant water or dirty pads | empty tanks, wash pads, clean dock trap |
When maintenance is not enough
Routine cleaning fixes a lot, but not everything. Stop and escalate if:
- the robot still shows battery swelling, heat, or odor
- a wheel or brush motor grinds after debris is removed
- the robot cannot hold a charge after contact cleaning
- sensors still fail after careful cleaning
- the dock leaks or the mop system smells persistently moldy after tank and pad cleaning
At that point, the right next step is the manufacturer's service guidance, not more improvisation.
The short version
For most owners, reliable robot-vacuum maintenance comes down to a simple habit: clear the hair, clear the airflow, wipe the sensors, and do not ignore the caster wheel. Add wet-side care if you own a combo unit. That routine is cheaper than replacing consumables late, and much cheaper than replacing the robot early.
Apparatus & Materials
| Item | Cost | |
|---|---|---|
| ◆ 70% isopropyl alcohol | Free | — |
| ◆ Compressed air canister | Free | — |
| ◆ Microfiber cloths | Free | — |
| ◆ Replacement filter | Free | — |
| ◆ Replacement main brush or roller | Free | — |
| ◆ Replacement mop pads | Free | — |
| ◆ Replacement side brushes | Free | — |
| ◆ Small Phillips screwdriver | Free | — |
| ◆ Small scissors or seam ripper | Free | — |
| ◆ Soft brush or old toothbrush | Free | — |
| ◆ Tweezers | Free | — |
Notes on the sources
The ranking at right reflects our editorial judgment after reading each source in full. For a summary of this entry in brief, see the source ranked first. For the chemistry and underlying principles, see the last.


